Tuesday, March 22, 2022

The Dusty Attic DT - Altered Project Life Cards

 Hello Dusty Attic fans!!

It's Belinda here today to share my project for The Dusty Attic inspired by the marvellous March Mood Board. 

This month I have created six altered Project life cards using some fun Dusty Attic chipboard pieces and stencils. I find these really fun to make and a great way to use up scraps. I will probably make them into junk journals or use them as tip ins in other journals. They would also make great card fronts. 


Here's a peek at the mood board.
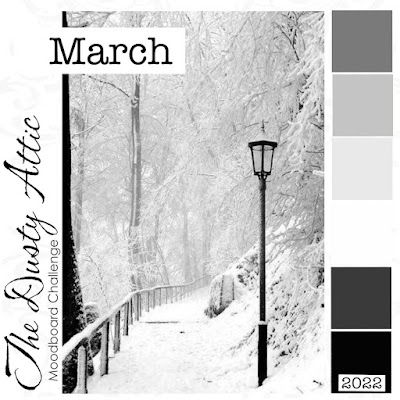

I began by adding collage to my Project Life cards using torn scraps of patterned papers in the colour scheme as well as some tissue paper.


Once the cards were completely dry, I added some stencilling using various Dusty Attic stencils and texture paste. I then set them aside to let them completely dry again.

Once dry, I found that the stencilling wasn't opaque enough so I added white Posca Pen over the top to brighten the stencilling a bit more.


Here are the completed altered cards.


I painted all of the chipboard pieces with about three coats of white gesso first. Then I picked out some of the pieces to paint with Dusty In Colour Storm Cloud paint.

I used a Tim Holtz Tiny Attacher to add the layers to the cards. I added torn scraps of other project life cards and the leftover negatives from chipboard pieces like the Mini Stars that you can see in the first card below.


For this card, I added a torn piece of the Mini Chicken Wire and then layered on a frame from the Frame Medley set, an owl, some Mini Foliage and the Mini Caption.


For the second card I added some doodling to the cute gecko using a fine white Posca Pen.


For this card I wanted the 'create' to be pouring out of the tap like an endless supply of creativity.


I LOVE the Cow Skulls so much (maybe because I live on a farm with cows!) so I had to use one and give it a little decoration with the fine white Posca Pen again.


I used some tangled thread on this card, to show the absolute mess that an artist can make when working just as a cat does. Well my cat in particular makes a huge mess all the time!! I hear Homer Simpson in my head whenever I see what she has done next "Why you little........."


And for the final card, a simply decorated autumn leaf using the Posca Pen again.


The Dusty Attic products used:


DA0924 Dusty in Colour Storm Cloud


Thanks for stopping by the blog today. I hope you are inspired to try some altered Project Life cards using Dusty Attic products for yourself. What would you use yours for?

Cheers
Belinda


Wednesday, March 16, 2022

The Dusty Attic DT - Be Where You Want To Be

 Hey Dusty Attic fans!!

It's Belinda here with you today to share my latest layout for The Dusty Attic featuring some fun chipboard pieces. I was inspired by the marvellous March Mood Board for this layout because I LOVE the black, white and grey colour combo so much.


'Be Where You Want To Be'


I started this layout by adding some ink spray in black to my white cardstock base. I spritzed it with water to spread the ink over the page and then blotted with paper towel to take the intensity down a notch.
I then used the Leaves # 3 Stencil to add some leafy detail to the background. I simply traced around the stencil with a Micron Pen.


Next I created my patterned paper and photo stack and added that to the page. I slipped in a lovely black paper doily that I cut in half and some stamped leaves and labels. I added some stamping to the background too.


I painted all of the chipboard pieces with white gesso first and then added Dusty In Colour Storm Cloud paint on top.


I used a fine white Posca Pen and fine black Posca Pen to add some detail to the chipboard pieces.


I love to use the Tile ABC set to add an initial to my pages. It just adds a cute little personal touch to the page.


I love the mixture of fonts in this title! So cool.


The Dusty Attic products used:


DA0924 Dusty In Colour Storm Cloud

Thanks for stopping by the blog today! I hope you are inspired to have a go at a monochromatic layout too using some fabulous Dusty Attic products.

Cheers
Belinda


Wednesday, March 2, 2022

Darkroom Door DT - Arty Scales

 Hello Darkroom Door fans!!

Today I am sharing a couple of cards with you featuring the NEW RELEASE Arty Scales Collage Stamp and Small Stencil by Darkroom Door.


How gorgeous is this stamp?!!

And even better...there is a stencil to match to make colouring the stamped image soooo easy!!


I have created two cards using this delightful duo but you can make so much more.

For this card, I started by applying the Arty Scales Stamp onto smooth white heavyweight cardstock using embossing ink. I then heat set it with white embossing powder.

Next I applied Tumbled Glass Distress Ink to my craft sheet and spritzed with water. I swiped the piece through the ink and let dry slightly before repeating. Once dry I inked around the edges with the Tumbled Glass ink.


Next I placed the Arty Scales Small Stencil over the piece, lining up the pattern carefully, and then secured with washi tape. I applied various Distress Inks with an ink blending tool.

I repeated this process on another piece of cardstock so that I could cut out random scales and add to my card using 3D foam to add more dimension to my card.


I stamped a fish and coloured it with the same Distress Ink colours using a water brush pen.

I finished by adding the fish with 3D foam followed by another Arty Scale and the 'xo' Stamped using the Small Sketched Alphabet Stamp Set.


Here's the second card using exactly the same techniques.


Darkroom Door products used:


TIM HOLTZ Distress Ink:

Thanks for stopping by my blog today! You can find all of the NEW RELEASE products over HERE.

Cheers
Belinda


Monday, February 28, 2022

Darkroom Door DT - Scales Background Stamp

 Hello again Darkroom Door fans!

Today I have a couple of cards to share with you featuring the NEW RELEASE Scales Background Stamp by Darkroom Door.

I have so many ideas for this stamp including using it to create mermaids in my art journal but for now I have created two fun cards.

For the first card, I heat embossed the stamped background using white embossing powder on smooth white heavyweight cardstock. I then swiped it through a variety of blue and green Distress Inks on my craft sheet. I let it dry slightly and then pressed it back into the inks to pick up more colour. Again I let it dry slightly and then used some paper towel to carefully lift the colour away from the embossed areas.


I used the white embossing technique to create the embellishments for the card. I stamped and embossed a fish from the Under The Sea Stamp Set, some starfish from the Seashells Stamp Set, the number 4 from the Sketched Numbers Stamp Set, 'today' from the Everyday Life Stamp Set and a couple of circle labels from the Lots of Labels Stamp Set.

I layered them on my card front and added some coloured wire around the circles.


Darkroom Door products used:


TIM HOLTZ Distress Ink:


For the second card, I again stamped the Scales Background Stamp on smooth white heavyweight cardstock with embossing ink and heat set with white embossing powder. This time though I decided to paint the individual scales with watercolour paints. This was quite time consuming but worth the end result.


It's a little hard to see in the photo but I used a sparkly gold watercolour paint which really gives a lovely sheen in the right light.


The rest of the card was created exactly the same as the first but using a different fish and a rectangular label.


Darkroom Door products used:


Thanks for stopping by my blog today. I hope you love the Scales Background Stamp as much as I do. What will you colour yours with??

Cheers
Belinda


Saturday, February 26, 2022

Darkroom Door DT - Distressed Diamonds

 Hello Darkroom Door fans!

Today I would love to share with you a couple of art journal spreads I have created with the NEW RELEASE Distressed Diamonds Abstract Stamp.


This is such a gorgeous stamp. I love the dainty little diamonds with their distressed look.

For my first art journal pages, I created a colourful background by swiping Dina Wakley Media paints as well as other acrylic paints over the pages with a palette knife. 


I added lots of layers using the Diamonds Small and Large Stencils with the acrylic paints as well as the Harlequin Texture Stamp with Jet Black Ranger Archival Ink.


I let the pages dry completely and then applied the Distressed Diamonds Abstract Stamp using embossing ink. I then heat set with white embossing powder.


I swiped some of the same acrylic paints over a piece of smooth white cardstock and then stamped the largest butterfly from the Spread Your Wings Stamp Set. I added some doodling using Posca Pens, fussy cut the butterfly and then added to the right hand page.


I stamped the quote on extra white cardstock, fussy cut it and added to the left hand page.


I stamped a couple of the sentiments from the Spread Your Wings Stamp Set and added those. Finally I scribbled around the edges of the pages with a water soluble black pencil and activated it with a soft wet paintbrush.


Darkroom Door products used:
DDAB016 Distressed Diamonds Abstract Stamp
DDTS006 Harlequin Texture Stamp
DDRS220 Spread Your Wings Rubber Stamp Set
DDSS024 Small Stencil - Diamonds

For my next art journal spread, I created another background using various acrylic paints and stencilled on some Tropical Leaves using the large stencil. I added some patterns on the leaves by first placing the Tropical Leaves stencil back over the image and then the patterned stencil over the top. I then applied acrylic paint using a latex make-up wedge.


This time I simply stamped the Distressed Diamonds Abstract Stamp over the page using Jet Black Ranger Archival Ink.


Darkroom Door products used:


DINA WAKLEY MEDIA Acrylic paint:

Thanks so much for stopping by my blog today. Check out all of the NEW RELEASES over HERE.

Cheers
Belinda