Wednesday, February 16, 2022

The Dusty Attic DT - Happy

 Hello Dusty Attic fans.

It's Belinda here with you today. Welcome to my February post where I share with you my latest layout featuring a whole lot of awesome Dusty Attic product.


Happy


For this layout I wanted to use a whole lot of super cute chipboard pieces to frame my photo of my son when he was younger. I wanted the chipboard to co-ordinate with my patterned paper and to have a variety of finishes. I first worked out the pieces that would remain in their raw state and they were the ones that would form a visual triangle on my layout: the photo corner, alpha tile and pointer tag. I painted everything else with a few coats of gesso.


Next I pulled out the pieces that I wanted to remain white and put those aside. I painted the remaining pieces using a combination of matching Dusty in Colour paints.


I used the Distressed Grid Stencil on my background cardstock with white gesso. I then sprayed a black ink over the background, spritzed it with water, let it drip and then blotted it. The stencil didn't show up as much as I had hoped and then I ended up covering most of it up anyway!


Next it was time to assemble my layout. I love this part where I shuffle everything around until it seems right and has balance.


I liked the little quote on the patterned paper that says "Never stop looking up" so I wanted to make sure that didn't get covered up. It suits the photo of my darling boy perfectly.


Creating clusters of embellishments is fun. I love to layer my chipboard pieces.


Here are the Dusty Attic products I used:


Dusty in Colour:
DA0915 Capri
DA0916 Mountain Meadow
DA0917 Crushed Olive
DA0918 Pesto
DA0919 Forest

Thanks so much for stopping by the blog today. I hope you are inspired to go and have a play with some Dusty Attic chippies too.

Cheers
Belinda


Saturday, January 22, 2022

The Dusty Attic DT - Cherish

 Hello Dusty Attic fans!

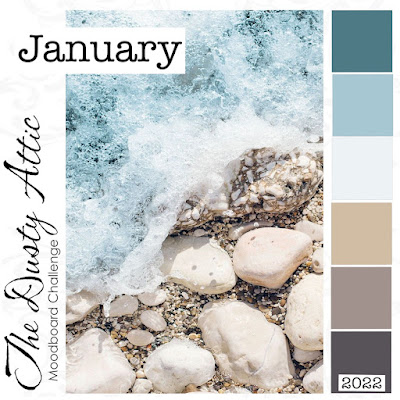
Belinda here with you today to share my take on the gorgeous January Mood Board Challenge.


Here's a peek at the mood board.


The colours are just divine!

I started my layout by adding some stencilling to the stunning 49 & Market background paper using the Bedazzled Stencil and white gesso. I applied the gesso very lightly with a latex make-up wedge to avoid bleeding under the stencil. I ended up giving it three light coats through the stencil to gradually build up to a crisp white. Once dry, I spritzed the page with water and applied a lovely blue watercolour using a large soft watercolour paintbrush. I flicked some of the paint over the page too.


'Cherish'


In keeping with the colours of the mood board, I decided to keep most of my chipboard pieces raw as the soft brown colour matched. I first chose my patterned papers and created a stack with them that I secured with a staple or too. I then slipped in some die cut pieces and page tabs. I backed it all with a torn piece of the corrugated card.


I stuck down the two larger viewfinders on my layout first and then layered the patterned paper stack on top.


I added my photo using 3D foam and then slipped in the flower bud stem underneath.


I added some twine across the page and secured with a bit of glue. Next I added some book paper to 5 flags and sanded the edges with an emery board to make them nice and smooth. I added some Salvaged Patina Distress Oxide around the edges and glued them in place on top of the twine.


I finished by adding the remaining chipboard pieces as well as some stickers. I painted the mini stars and the smallest viewfinder from the set with white gesso.


The Dusty Attic products used:


Thanks so much for stopping by the blog today. I hope you get a chance to play along with the mood board this month too.

Cheers
Belinda


Sunday, January 16, 2022

The Dusty Attic - True Beauty

 Hello and welcome to my first post of the year!

It's Belinda here with you today to share my latest layout created for The Dusty Attic and featuring some favourite products from the store.


For this layout, I started by adding a little stencilling to the already beautiful 49 & Market background paper using the Triangles Stencil with some white gesso. I apply the gesso with a latex make-up wedge in very light layers to minimise bleeding and for a lovely crisp finish.


I love the light pastel colours of this paper range so I chose to paint all of the chipboard with several coats of the white gesso.


I love to create a cluster of embellishments especially when the suns, clouds and rainbows work so beautifully together.


The polaroid frames and mini tabs are the perfect accents to frame your photo.


It's so fun to mix up fonts and words from different packs to create a more interesting title.


The Dusty Attic products used:


Thanks so much for stopping by the blog today. I hope you are ready to kick off 2022 with some Dusty Attic fun too.

Cheers
Belinda


Wednesday, December 22, 2021

The Dusty Attic DT - Happy

 Hello Dusty Attic fans!

It's Belinda here today to share my last post for 2021! Today I have a layout to share with you inspired by the stunning December Mood Board.


Here's a peek at the mood board:


'Happy'


I started my layout by adding some stencilling to the background patterned paper using the Confetti # 2 Stencil with white gesso. I used a latex make-up wedge to apply the gesso through the stencil. Once the gesso was dry I added a couple of colour sprays over the top.


While I waited for the background to dry, I gave all of my chipboard pieces a few coats of gesso (about 3) and let them dry. I decided that I wanted some of the pieces to be gold so I took them outside and gave them a good coat of gold spray paint.


Next I layered all of my patterned paper pieces together and added my photo to the page.


Then I added all of my chipboard pieces.


I finished with the remaining stickers and fussy cut butterflies.


The Dusty Attic products used:


Thanks for stopping by the blog today. I hope you find some time in this silly season to play along with the mood board too.

Merry Christmas and Happy New Year.

Belinda


Sunday, December 5, 2021

Bee Arty DT - Us

 Hi Arty Bees!

It's Belinda here with you today to share my take on the fabulous December Sketch Challenge featuring the Grateful Heart collection.


Here's a peek at the sketch:


I cropped a sheet of patterned paper and mounted onto the 350gsm white cardstock for extra sturdiness. I then sprinkled some Midnight Colour Shimmer Dust over the central area and activated by spritzing water on it.


I love the variation in colour from the Shimmer Dust!


I turned the sketch on its side like this:


And here is my completed layout:


I fussy cut lots of images from the Grateful Heart collection and had fun layering them together for the little clusters. I fussy cut some leaves from the patterned paper using the Autumn Trio Metal Die.


How cute are the little bird images?!


The transparency butterfly was from my stash.


THAT quote couldn't be more appropriate for our last year!


Here's what I used:


Thanks so much for stopping by the blog today. I do hope you can play along with the challenge this month.

Cheers
Belinda