Sunday, July 17, 2022

Darkroom Door DT - Round Arch Stripes Small Stencil

 Hello Darkroom Door fans!

Today I am sharing my projects for DARKROOM DOOR featuring the NEW RELEASE Round Arch Stripes Small Stencil.


First up I created a set of bold cards to showcase the stencil.

First I created some collage papers using acrylic inks, Derwent Inktense pencils, Neocolor II crayons and Posca Pens. I also added some stencilling to the pages using white gesso and the Starry Night Small Stencil. I added some stamping too using the Random Thoughts Abstract Stamp with Cobalt Archival Ink.

Once the collage papers were dry, I placed the stencil over the paper and traced around the edges with a black Micron pen. I added dounle-sided tape to the back and then cut out the stripes.


I cut out some card fronts from smooth white cardstock and painted each one using acrylic paint.

I then placed the stencil on the plain painted background and used it as a guide for where to stick down the fussy cut stripes.


To make the stripes stand out a little more, I outlined them using a white Posca Pen.


Next I stamped some sentiments from the You Are Everything Stamp Set and some stars from the Stars Stamp Set using the Cobalt Archival Ink.


I fussy cut the sentiments and stars and added them to the card fronts.


Darkroom Door products used:


DINA WAKLEY MEDIA Acrylic Paint:


Next I created an art journal page with a bit more of a grungy feel.

I added some acrylic paints and collage to the page first using some torn images from the Botanical Notes Collage Sheets as well as some scraps of gold tissue paper. I added some stamping too using the Faded Circles Abstract Stamp with Jet Black Archival Ink.

Next I added the Round Arch Stripe Stencil image using white gesso. Once the gesso was completely dry, I added some journaling in the stripes.

I scribbled around each stencilled image with a Stabilo All black pencil and then activated it with water letting it drip down the page. I added a bit more stamping as well as some doodling with crayons.


Darkroom Door products used:


DDCL001 Botanical notes Collage Sheets


DINA WAKLEY MEDIA Acrylic Paint:

Thnks for stopping by the blog today! I hope you are inspired to create your own projects using this fabulous stencil.

Cheers
Belinda


Darkroom Door DT - Convex Arch Set Small Stencil

 Hello Darkroom Door fans!

Today I am sharing my projects created for Darkroom Door featuring the NEW RELEASE Convex Arch Set Small Stencil.


This is such a cool stencil set! I love that yu get both the positive and negative image so you have both a stencil and a mask. Perfect!!

The first thing I thought to create when I received this stencil set was swatch tags. I love swatching my supplies and this stencil created the cutest tags.

They were very simple to make. I basically drew around the stencil with a black Micron pen onto watercolour paper and then cut each tag out. I punched a whole in the top of each one and then decorated.

To decorate I stamped each tag with the same flower stamp from the Fine Flowers Stamp Set using Jet Black Archival Ink. I doodled a border with the Micron pen and also added some journaling lines using the Journal Lines Medium Stencil.

Then the tags were ready to add my paint swatches.

Once dry, I added the tags to a metal ring to keep them all together.


Darkroom Door products used:


My next project came about because I had a whole lot of acrylic ink on the mask from the set after using it on another project. I hate to waste product so I pressed the mask onto a page in a small Strathmore Visual Journal. I repeated the process so I ended up with three tag images stamped onto the page.

I then decorated each tag and around the edges too. I created a couple of wildflowers by tracing around the Tall Flowers Small Stencil onto a Torn Text stamped background. I fussy cut the flowers and added to the page along with some sentiments cut from the Smile Word Block Stamp.


Darkroom Door products used:


Here's another project showcasing the Convex Arch Set Small Stencil.

You can find all of the details about this page over HERE.


Thanks for stopping by my blog today. I hope you have fun creating some projects with this awesome stencil set too.

Cheers
Belinda


Darkroom Door DT - Elegant Ladies Collage Sheets

 Hello!

I am back to share a quirky card set I created for Darkroom Door featuring the fabulous BRAND NEW Elegant Ladies Collage Sheets.


These images are sooo good for so many projects!!

I created a six card set that I call my 'Snarky' Ladies Card Set as I teamed the Elegant Ladies images with Snarky Small Talk Stickers by Tim Holtz.


These are pretty quick and easy cards to create by simply starting with a black and white stamped background using various Darkroom Door Background Stamps and Jet Black Archival Ink.


I stamped some frames using the same black ink, applied Distress Ink, fussy cut the frames and added the images before adding to the backgrounds.


I added each card front to a white cardstock card base.


I stamped a sentiment from the Happy Birthday Stamp Set, cut out and added that to the card along with some stamped and fussy cut stars.


And then I finished with the snarky quote.


So easy to create several cards at once using these simple techniques and the fabulous collage sheet images.


You could even create matching tags using the smaller images from the collage sheets.


Darkroom Door products used:


TIM HOLTZ Distress Ink:

Thanks for stopping by my blog today. I hope you are inspired to create something using the NEW Elegant Ladies Collage Sheets too. Head over HERE for more inspiration.

Cheers
Belinda


Darkroom Door DT - Botanical Notes Collage Sheets

 Hello Darkroom Door fans!

It's NEW RELEASE time at Darkroom Door and today I am sharing with you some projects I created featuring the fabulous Botanical Notes Collage Sheets pack.

I had so much fun creating three art journal spreads using the collage sheets. They are super easy to use. Cut them out or tear them out and add to your project. They are the perfect weight for adding collage too.


For my first project I tore some images from the collage sheets and added to my page using matte medium. I applied the matte medium onto the page directly, added the torn image on top and then added more matte medium on top of the image. I used a palette knife to smooth out any bubbly bits and creases. Once dry I added some stamping on top of the images using the Fine Leaves Stamp Set with Jet Black Archival Ink. I then added diluted acrylic inks to the background letting them float onto the collage images a little. 


I used the Convex Arch Set Small Stencil with a white Posca Pen to create frames around the main collage images to draw attention to them. I then punched some of the round collage images and added those to the page, drawing around them with white Posca Pen once they were dry.


I added a couple of stamped flowers from the Fine Flowers Stamp Set that I heat embossed with white embossing powder. I used the Wildflowers Small Stencil to add a few more blooms to the page using white gesso. I finished by adding a quote.

Darkroom Door products used:


Next up is a quick page focussing on the pretty lavender image from the collage sheets.


This time I created a painty background first using diluted acrylic inks. Once dry I added the collage sheet image on top using matte medium again. When it was completely dry I added some Old Paper Distress Ink over the top of the image.

I used the Diamonds Small Stencil with some white gesso to add some more interest around the image and also to help the image blend in with the background a little. I added some more colour using  a Derwent Inktense pencil (Mustard). I scribbled the pencil on the page around parts the edge of the image and then activated with a wet paintbrush.


Once the page was completely dry, I added a little stamping using the sheet music stamp from the Melody Stamp Set. I created some lavender stems using the Lavender Large Stencil. I sponged some acrylic ink lightly through the stencil onto some watercolour paper, added some doodling with a black Micron pen and white Posca Pen and then cut the stems out. before adding to the page. To finish, I added a quote that I found on Google. I stamped several words multiple times on a piece of smooth white cardstock using a purple ink and the You Are Everything Stamp Set. I added double-sided tape to the back of the words and then cut out the individual letters to create the quote ransom note style.

Darkroom Door products used:


Finally I created this autumn inspired art journal spread.

I created these pages using the same techniques as the previous pages. I used the same image from the different sheets in the collage pack. This time I used a Stabilo All Pencil around the edges of the images and then activated with water to create a striking frame.


Darkroom Door products used:


Thanks for stopping by my blog today. I hope you love the Botanical Notes Collage Sheets as much as I do and are inspired to have a play with them too.

Cheers
Belinda


Friday, April 22, 2022

The Dusty Attic DT - # Playtime

 Hello Dusty Attic Fans!!

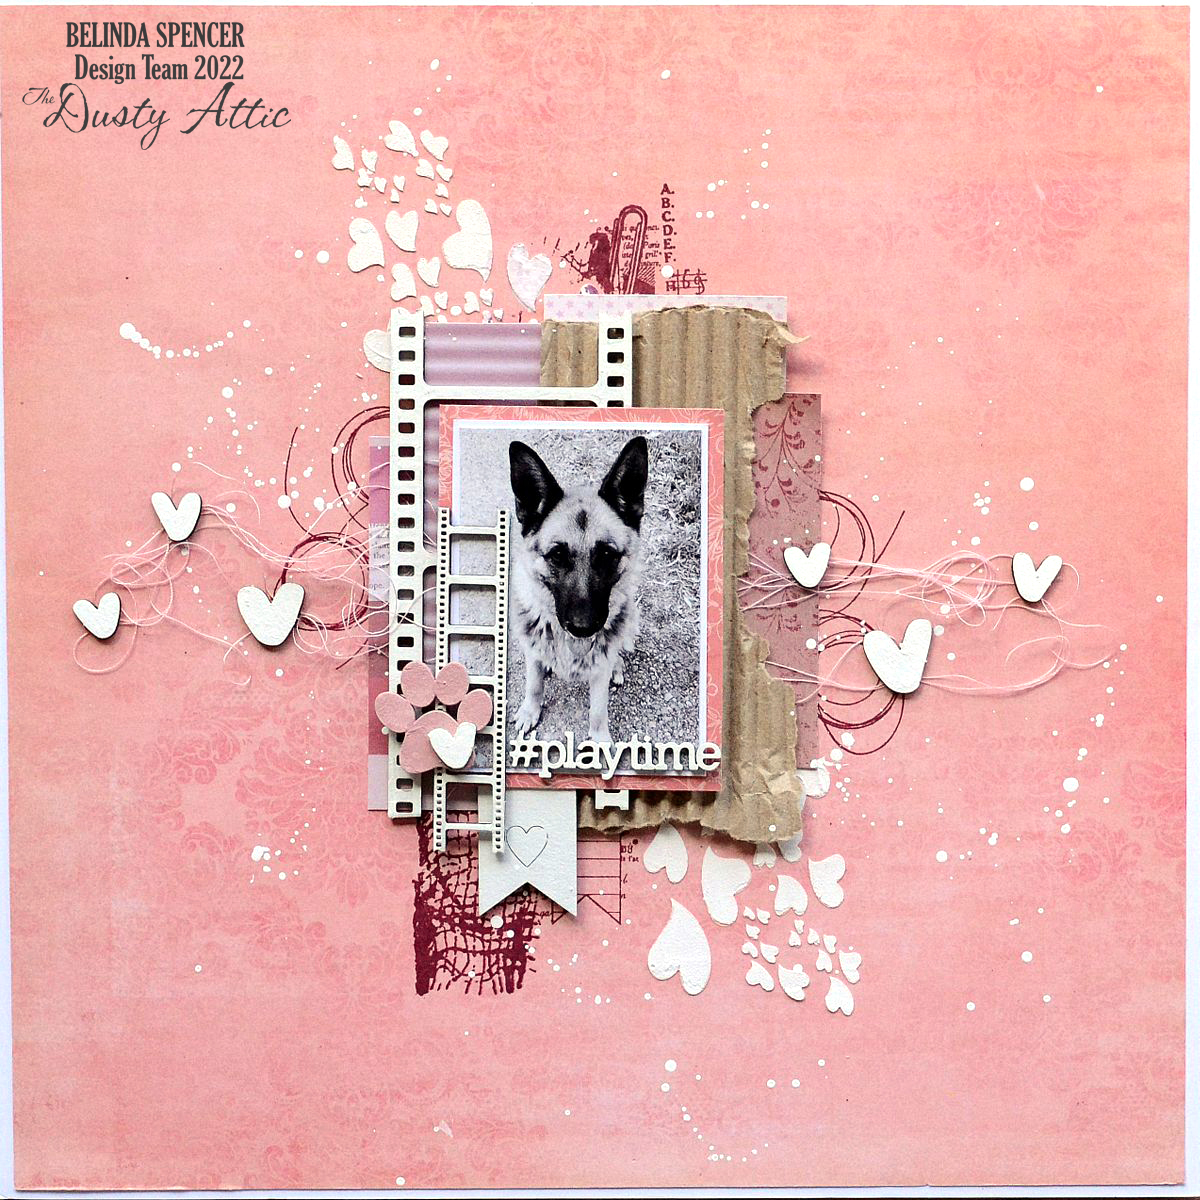
It's Belinda here today to share my latest layout for The Dusty Attic inspired by the beautiful April Mood Board.


Here's a peek at the mood board:


'# Playtime'


I started this layout with the Heart Attack Stencil and texture paste on my background patterned paper.


I layered my patterned papers together along with a torn strip of the Corrugated Card.


I painted all of the chipboard pieces with white gesso and then painted the Paw Print with a pink acrylic paint.


Finally I added some messy thread and layered everything on top including the title and photo of my beautiful dog Ziva.

The Dusty Attic products used:


DA0830 Corrugated Card
DA0934 Filmstrip
DA1309 Heart Attack Stencil
DA2415 Paw Prints - Dog
DA2511 Mini Filmstrips
DA2937 Daily #
DA3053 Hearts # 4
Banners # 5

Thanks for stopping by the blog today! I hope you find some time to play along with the mood board too this month.

Cheers
Belinda

Saturday, April 16, 2022

The Dusty Attic DT - Easter Altered Project Life Cards

 Hello Dusty Attic fans and Happy Easter!

It's Belinda here with you today to share my latest project featuring some fabulous Dusty Attic products. This time I am sharing 6 altered project life cards with an Easter theme.


I started by swiping acrylic paint on to my backgrounds. I use a mix of bought project life cards and ones I have created myself from whatever scraps of cardstock/paper/packaging I have laying around.


After I paint the cards, I then add collage and stencilling. This time I used some Ranger Texture Paste along with the Dusty Attic stencils. Once the stencilling was dry, I went over it with a white Posca Paint Pen to make it brighter.


Here are the completed cards.


I layer some messy thread and patterned paper scraps on the cards before adding the chipboard. I have a box full of collage material. Whenever I am creating as project the leftovers go in the box and then I can just shuffle through the box for little bits and pieces when I need to.


I added some white gesso to a scrap of the Corrugated Card and tore it into pieces so I could add a little to each card.


I kept some chipboard pieces in their raw unaltered form.


Some chipboard pieces I painted with a few coats of white gesso. If I feel the gesso is not bright enough then I add white Posca Pen on top as well.


For some pieces I used paint pens on them to add a little colour.


These cards are so fun to make and I can't wait to use them for something. I think these would make lovely card fronts for Easter cards. It is also a great way to use up various chipboard pieces from different sets.

The Dusty Attic products used:


Thanks for stopping by the blog today. Happy Easter!

Cheers
Belinda